 Are you thinking about getting started in model railroading, but are unsure of how to proceed? Whether you've got a large basement to fill with trains, or you only have room for a small layout like Sheldon here, you can enjoy the fun of model railroading. Long-time Reading modeler Barry Hensel has given a "Basic Layout Construction" clinic at his local NMRA meets for several years that provides an overview of the basics you need to know to get started if you're thinking about building a layout. Read on!
BENCHWORK
Benchwork is the foundation of your layout. If it is not constructed well, your layout will not operate well and will not hold up over time. Most layout benchwork is built with 1x4 or 1x3 lumber. Please be extra careful when choosing your lumber! Make sure it is straight and as knot-free as possible.
There are several styles of Benchwork construction, we'll be discussing the "open grid" style. Your benchwork is made like a wall, with a top rail, bottom rail and "studs" in between. However, our wall is laid on its side to make your benchwork. Benchwork is usually built in sections of varying length. One consideration is how long (and wide) of a section can be taken up the stairway, in the event of a move to a new location. As for that WIDTH dimension, your layout plan will dictate that. One should consider how far you can reach when the section of layout is raised to its final height. Usually, 30-32" is a maximum comfortable width. Once you have your lumber cut to size, it's best to pre-drill all holes to avoid splits, and if possible, use a counter-sink bit so that the screws are flush with the wood. Screws are your typical drywall screws - you should have 2-3 sizes available. The "studs" in your benchwork should be spaced no greater than 24" apart! It's best to complete one section before starting on the next. Feel free to screw left-over boards/scraps together to make the length you need. This is NOT a wall, so maximum support is not a concern. Once you have 2-4 sections complete, you can raise them to the height you want the layout to be, depending on your track plan. Legs of 2x4 lumber are very sturdy for your legs.
ROADBED
Roadbed is the material on which your track is laid. The best roadbed is a combination of 1/2" plywood and 1/2" Homasote making almost a 1" thick roadbed. Homasote is a pressed paper product, similar to bulletin board material. It's used for model railroading because it is easy to nail into, and it also deadens the sound of your trains as they operate. You can also use plain plywood (3/4" is recommended), and even 1x lumber boards make good roadbed for straight sections. Your roadbed should be cut at least 1" wider than your track width, considering all tracks in a section of your layout. This will aid in scenery construction later. You should also paint the Homasote. Any latex paint will do and any color will do, but if you have a choice, a nice tan or light brown would be best. This way, if any of the paint shows through your scenery, it simply looks like dirt. Painting the Homasote will seal it against moisture - this is important later during scenery construction. You can paint the Homasote before or after its installation, but before laying track.
RISERS
Risers are made from lots of your scrap 1x4 benchwork lumber. They support the roadbed ABOVE the benchwork. This allows for scenery below track level! Risers should be used on every cross-brace on your benchwork, spaced no more than 24" apart for optimum support. Depending on your track plan, risers may not be needed! If you are planning a large yard or flat area for a town scene, then that section of benchwork should be about 1.25" below where you want the rail height to be from the floor. Your roadbed can then be attached directly onto the benchwork, and thus, no risers are needed in that area. This also means that your benchwork can vary in height throughout your layout. Your track plan will dictate how/when this will/can happen. Some model railroaders make their benchwork the same level no matter what and then use risers on all roadbed, even large yard/flat areas. The choice is yours. Because your track plan may call for some tracks to be higher than others, risers should be made in all sizes of heights. A rule of thumb would be that risers are the height of track plus benchwork height. The cleat on a riser is about is 1 x 4 x 1.25. Don't forget to pre-drill all holes for screws, as these are small pieces of wood and tend to split very easily.
TRACK
There are many options and manufacturers of track. You will need to decide on which you want to use. Track with plastic ballast works well, but you are confined to the pre-shaped sizes they make. Yes, these pieces can be modified, but only in length, making them a bit constricting in terms of layout design. Most model railroaders use FLEX track, which is a 36" section that will bend just about any way you want. Sections of flex track are connected with rail joiners, similar to the pre-set track. When connecting flex track on curves, you should off-set the rail connections, so that they are not directly across from each other. This makes for smoother travel and less chance of gaps in the rails and derailments. Your mainline track should also be placed on cork roadbed (yes, more roadbed!). The cork simply nails or glues to the wood/homasote roadbed, then your track is nailed on top of that. The main reasons for cork are to provide additional sound deadening and to give the mainline the elevated look of real track. Your sidings and yard tracks can be directly laid on the roadbed, making them look more realistic and saving money in cork!
TURNOUTS
Turnouts (we use the term "Turnouts" so as not to confuse these with electrical "switches") are used to make one track into two, for sidings and cross-overs. These need to be placed into your track work as you progress, as opposed to cutting them into place later on - this is MUCH more difficult. When installing a turnout, you need to mark on the roadbed where the turnout throw bar is located. Then, drill a 1/2" diameter hole in that spot, centered on your track center. This hole will be used later when you install a motor or other device to control that turnout remotely. If you do not plan on controlling the turnout from a remote location, you do not have to drill the hole. However, if you change your mind later, it is most difficult to drill that hole when the track is in place.
Once all your track is laid, or at least a section or two, you should paint the rail sides a brown color to make them look rusty. Even brand new track is rusty, so your track should look as real as possible too. An easy way to do this is to use a paint marker/stick and simply run it along the rail sides. NOTE- you don't have to do both sides of each rail… only what you can see from your layout's aisle! This saves paint and more importantly, TIME! Some model railroaders spray paint their entire track, which also weathers the ties nicely. Either way, make sure you scrape off any excess paint from the rail heads (the tops of the rails), or your trains will not operate well.
FASCIA
To make our layouts nice looking in appearance, we use a fascia board. This is usually made from 1/8" masonite board. Be sure to get the TEMPERED type! At this width, the masonite board is flexible and can be curved around corners of your layout. This gives your layout a smoother look! The fascia board is also cut to the contour of your proposed scenery. This can be done as it's installed, or afterward. You'll have to plan how tall each section needs to be. You can use paneling strips to help hide the joints between pieces, or simply tape and plaster the joint like drywall. Fascia board can be screwed to the benchwork (counter-sink those screw holes!) or even simply nailed with paneling nails. Once installed, paint the fascia any color you want to. Some suggestions are a green for eastern railroads or tan for western railroads. This helps blend the fascia into your layout's scenery primary colors. A universal black is also OK to use!
ELECTRICAL
Now it's time to start wiring your layout for track power. Most model railroaders are now using Digital Command Control (DCC) power systems. This type of control requires a receiver, or decoder, installed in each locomotive you plan to run on your layout. There are many different brands of DCC systems, but they all work together as far as locomotive decoders are concerned. Do your homework and select a system that you are comfortable with and has the options you believe you will need. Track wiring is the same, no matter which system you use. With DCC, there is power to the track at all times. The locomotive decoder determines direction and speed. This makes wiring MUCH easier! You will want to run a buss line all around your layout. This should be at least 12 gauge wire. You can attach the wire to the underside of your benchwork, or drill holes through all cross-braces and feed the buss line through the holes.
Once the buss line is in place, it's time to wire the track with "track feeder" wires. These should be 18-22 gauge wire. Make sure you use two different colors, so you can keep track of positive-negative on your rails and buss line. Your track feeders should be as long as needed to reach from the track to the buss line, comfortably! Take a track feeder, strip about 1" off of one end and "tin" it with solder. Once cool, bend that end into a L-shape with the "bottom of the L" being about 3/8" long. This is the part of the feeder that will be soldered to the side of the rail. Remember we painted our rails… now you have to remove the paint so that the solder holds to the rail side. (you could wait to get your track wired and then paint it too!) Drill a small hole right next to the track rail. Feed the un-stripped end of the wire through the hole until the L-shape is next to the rail. Apply the soldering iron to the tinned wire and apply extra solder if needed. Try to keep this solder joint neat and small, so it is undetectable. After a few seconds, pull the wire through the hole to make sure the joint is solid. You should add a track feeder to every section of rail, but do not solder to turnouts. Now connect the feeders to the buss line. This can be done several ways- one is to strip a piece of the buss line, strip the end of the feeder and solder the two together. A easier way is to use "suitcase" connectors, which clip over the buss line. Place the un-stripped end of the feeder into the connector and squeeze with pliers. The metal tang in the connector cuts through the insulation of both wires, connecting them. No soldering! There are also other types of connectors that have been used that do not require soldering.
Once everything is connected, hook up your system to the buss line and test run everything! It will be harder to correct problems once you start on your scenery - do it now!!
BASIC SCENERY
Most model railroader are now using construction styrofoam sheets to create their land forms. Both the pink or blue type are OK to use, but do not use the white "beady" style as this makes an even bigger mess when carving and shaping. Cutting the styrofoam is easy with a decent size steak knife. Pile the pieces to get a basic shape and glue them together with either white glue or construction bonding material, like Liquid Nails. HOWEVER- make sure you purchase the type of adhesive that is LATEX based!! If you try to use regular Liquid Nails, it will eat through the styrofoam!! Once everything has dried for a few days, you can come back and shape your hills/mountains with a "surf-form tool". It looks like a cheese grater with a handle. NOTE- this will make a mess - get the shop-vac handy before starting! If you wish, paint your land forms green or tan to give your layout an almost "instantly finished" look! If you are so inclined, you can cover the styrofoam with plaster cloth material to give it a smoother surface and cover any imperfections. You can also use strips of newspaper and plaster in a "papier-mache'" style of covering. If using this method, when mixing the plaster, mix in some tan latex paint to color the plaster. This way, if you get a plaster chip, it does not show through as a white spot on your layout! If using plaster cloth, once dried, paint everything in tan or light brown. This again will hide the white plaster from showing through any finished scenery.
FINSHED SCENERY
The ways to finish scenery are as varied as model railroaders are! There is no "wrong" way to do this. Usually a coating of white glue over an area is the start. Spread it around and then sprinkle your ground cover on it. Ground cover can be real dirt or the many commercial products on the market. Once covered, take a spray bottle of "wet-water" (water with a drop or two of dish detergent in it) and spray the area, soaking everything. This will draw the glue into the ground cover for maximum adhesion. You may have to add more ground cover to help soak up some of the glue-water. You can plant trees into your land while the ground cover is drying, by poking a hole into the styrofoam and placing the tree into the hole. Usually, gluing is not necessary. Vary your tree sizes and colors… not much in nature is uniform, so this will add to the realism of your scenery. And don't forget to add in a "dead tree" or two… they are always around.
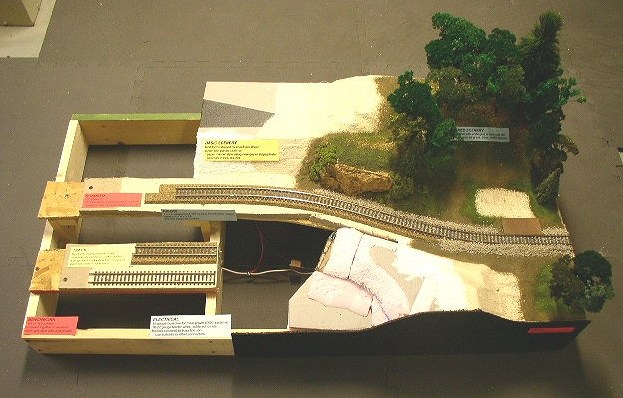
Here is a photo of a diorama illustrating the components outlined on the preceding pages. If you have any questions regarding construction techniques, you can e-mail Barry Hensel at This email address is being protected from spambots. You need JavaScript enabled to view it.. Happy Modeling!


 A variety of Reading Company operations related documents, etc. that may be of use in your modeling efforts.