FacebookTwitterDiggGoogle BookmarksRedditLinkedinRSS Feed
Welcome, Guest
Username: Password: Remember me
This section of The Interchange provides a space where members of the Reading Modeler community can showcase their Reading modeling efforts. If you've got a project that you'd like to share, start a new topic and "show and tell" the group how you did it!

TOPIC: RDG SD45

RDG SD45 11 years 2 months ago #435

  • JoannaBill
  • JoannaBill's Avatar
  • OFFLINE
  • Road Foreman of Engines
  • Posts: 422
  • Thank you received: 63
I made this conversion on an Athearn unit some years back. I wouldn't be afraid to cut anything up anymore, just too many things already waiting to be worked on. The Cannon cab amkes the job a little bit simpler.
The administrator has disabled public write access.

RDG SD45 11 years 2 months ago #446

  • rdg5310
  • rdg5310's Avatar
  • OFFLINE
  • Conductor
  • Posts: 265
  • Thank you received: 39
Thanks Mark, Well now I know why I never did see Jim's article, after the year 2k, I quit buying MR unless something really caught my eye. The problem with MR and for RMC (but not as bad), they had a tendacy to butcher build type articles. He probably had the cab build all spelled out but, MR edited out. Jim did complain about this in one of the forums. But, I was building these cabs long before that, I think he copied me. :cheer: As for brian, a great modeler. I do enjoy his work. You should have no problem following this aricle and doing the 3 models you have. This SD45 I'm doing; I'm not keeping. I do have a proto that I'm putting together that is mine. I will have that ready for the Northeast fallen flags RPM at the end of September. I will probably post a quick article on that.

Hi Butch, I did those old blue box extensions back in the day of the fat body just like JB mentioned. The Cannon cab face is narrower, so keep that in mind. I used to just cut up another Atheran cab for the extension. I was never a big fan of that conversion. When RPP came out with their scale hood SD45, it was lights out! I cannonized! Cab,nose and sub base.
Thanks guys, more of this build coming on Thursday.
The administrator has disabled public write access.

RDG SD45 11 years 2 months ago #463

  • VCtrainmaster
  • VCtrainmaster's Avatar
  • OFFLINE
  • Engineer
  • Posts: 106
  • Thank you received: 12
Thanks for finding the Jim Six artical. I have seen many a artical in the 80s & 90's model Railroading mag. by Jim. I checked all my old copies. I couldn't find anything. Totally forgot it was in a Model Railroader Mag. But light went on when it was found. At the time I bought several cannon cabs for the project. just never got started. Thanks again. I knew I wasn't losing it.
Daniel J Mohr
The administrator has disabled public write access.

RDG SD45 11 years 2 months ago #477

  • MarkFJ
  • MarkFJ's Avatar
  • OFFLINE
  • Conductor
  • Posts: 227
  • Thank you received: 39
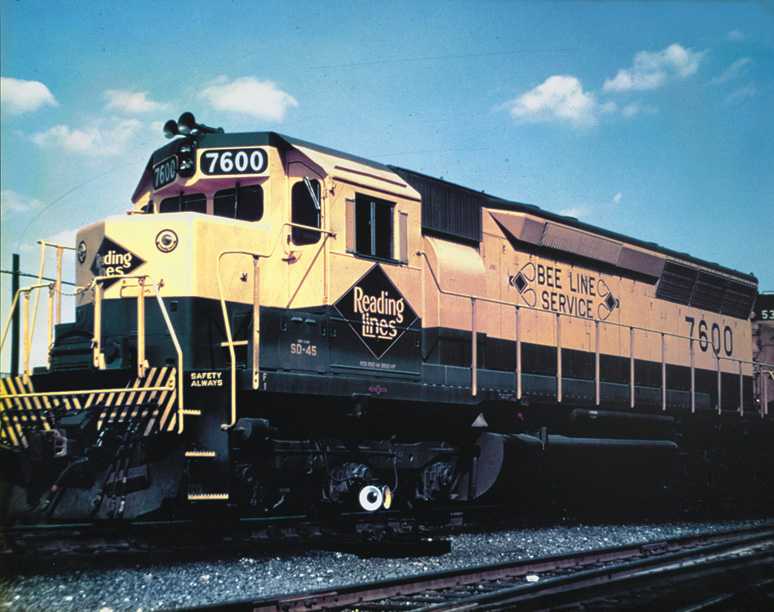
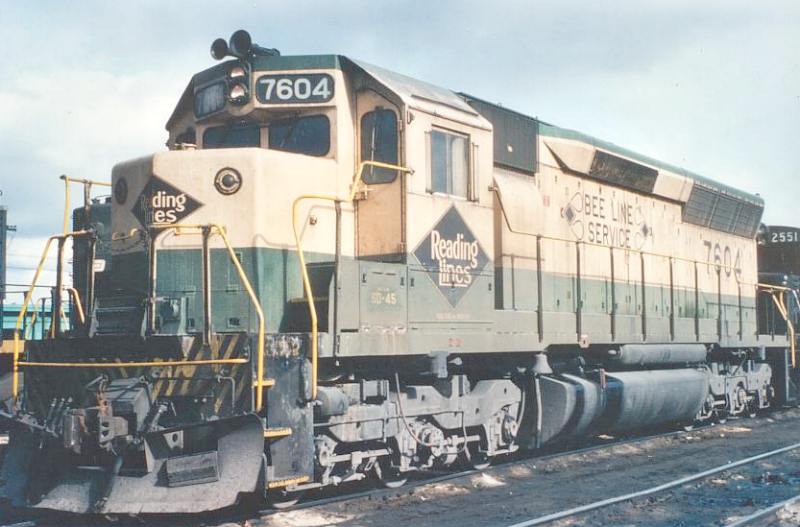
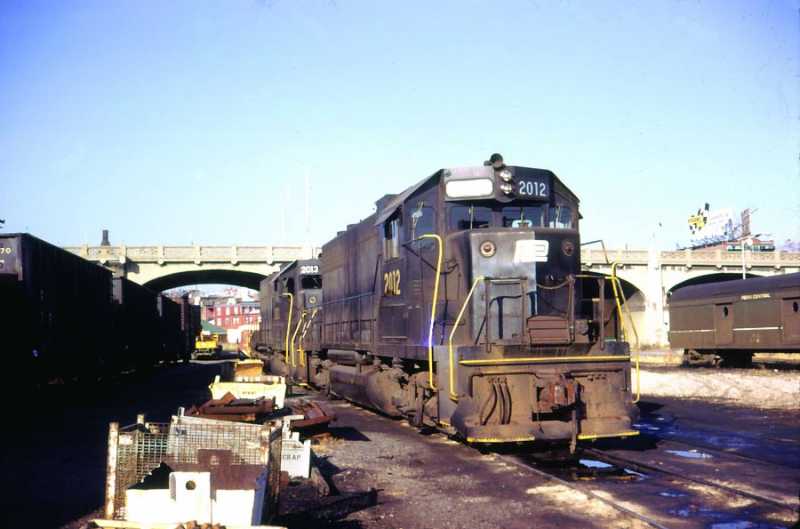
Here are some photos to add to the topic:

First up is #7600 in fresh (clean) paint. Someone had posted a photo on the old forum showing one of the Reading units in “pristine” condition (maybe just delivered) with yellow journal covers. It’s the only photo I’ve ever seen of this locomotive class where the journals were painted that color! (Whoever has that photo, please repost it.) Note that the headlight housing is green and there is a distinctive bulge under the housing. Some GP35s have yellow headlight housings and all have straight sheet metal work under the housing. Also, the angled metal roof extension meets the main roof slight back from the bend where the panel starts for the number boards from the extended sides.


tl-sd45.jpg


#7604 showing some wear and tear.


SD-457604.jpg


PRSL GP38s at Reading. They also had dual control stands and thus extended cabs. It’s interesting to note that these units have no side marking on the long hood indicating that they are PRSL units.


rdg_prr_2012reading.jpg
The administrator has disabled public write access.

RDG SD45 11 years 2 months ago #484

  • rdg5310
  • rdg5310's Avatar
  • OFFLINE
  • Conductor
  • Posts: 265
  • Thank you received: 39
To finish the cab extension, I use .005 sheet styrene and cut down a piece that is .100 wide x .825 long. I used a good straight edge and a sharp knife for this. Make your marks and cut. I use these as end caps for the outside of the extensions. You can attach these using thin ACC. You don’t want use liquid cement as it will melt the thin plastic. Now when I set these in place, I set these about .010 from the top of the .015 roof cap. This will give you a nice little ledge to rest the cab roof extensions on. I apply the thin ACC using an applicator. I take tweezers and place the end caps against the back wall while making sure I leave the .010 for the roof angles. If you’re unsure of my explanation, do a dry run before applying glue. If the caps are a little wider the extensions, that’s ok. They can be trimmed up after some drying time with a sharp knife. Then you can clean up the edges with some wet/dry 400 grit sandpaper.
To make the angles for the cab roof extension, I take .010x.125 strip styrene and cut two pieces at a length of .380. I suggest that you measure your cab to make sure that is the length you need. You might want to cut a few extra just in case of a screw up while making your angled cuts. I use a straight edge razor to make my cuts. I cut these corner to corner. Actually, I cut just a tad to the outside of each corner. I don’t want to lose the actual corner.

I also file a small angle at the top of the roof extension. This will allow the roof extension to sit flush to the cab extension. I test fit the parts. I use liquid cement and apply it to the edges that will be attached to the cab. Set these in place and make sure your flush to the cab roof and extension. Any imperfections like tiny gaps between the extension and the roof angles can be filled using thick ACC. Allow the cab to dry overnight. The next day you can clean up those gaps and re-apply ACC as needed. You need to, take a file and clean up the edges of the roof extension also. I also want to share a trick I’ve been doing for years that will aid you in eliminating scratches, dings and gaps. It’s called Mr.Surfacer 500. It’s a solvent based model primer that fills scratches, blending imperfections between parts and the list goes on. A paint brush can be used to either dab or paint the primer on the imperfection. When it dry’s, it can be wet sanded smooth. The primer can be sprayed on also. You can search and find it on the net.

The pic below shows the cab extension with the outer wall cap and the roof extension.


Now, take the Cannon number board and remove it from the tree. Gently scrape away and flash or tree mold marks. Remove the headlight cap by either gently shaving or scraping. Clean that up with some sandpaper. I don’t attach the headlight at this time. That will be last after painting. The headlight that I will use is DA 1024. I don’t glue this on yet, I will attach the headlight after painting. It makes it easier to mask. Attach the number boards using white glue. After the cab has dried overnight, take the number board and see how it fits to the cab. Make sure it is flush and sits nicely on the cab face. I use liquid cement to set the number board in place. I let this dry for an hour before finishing the cab details.
The administrator has disabled public write access.

RDG SD45 11 years 2 months ago #491

  • MarkFJ
  • MarkFJ's Avatar
  • OFFLINE
  • Conductor
  • Posts: 227
  • Thank you received: 39
Ron,
Someone was kind enough to post this link on the old forum. It should help you get the dimensions perfect for the distinctive “Reading” drip strip. I believe the SD45 and GP35 had similar strip lengths and locations.

drip strip

Really enjoying the build!
Thanks, Mark
Last Edit: 11 years 2 months ago by MarkFJ.
The administrator has disabled public write access.
Time to create page: 0.131 seconds

Today's Image

Did You Know?

January 1, 1955
The Reading begins Trailer-on-Flatcar (TOFC) service between Philadelphia and Chicago in cooperation with the WM, P&WV, and NKP (the "Alphabet Route").

Downloads

Operations Information

Click Here!A variety of Reading Company operations related documents, etc. that may be of use in your modeling efforts.

Operations Paperwork

Click Here!A variety of Reading Company operations paperwork, such as train orders, clearance forms, etc. that will help you operate your Reading layout in a prototypical manner.

Timetables, Rulebooks, Etc.

Click Here!Public Timetables, Employe Timetables, and Rulebooks that provide much useful operational information.

Modeling Goodies

Click Here!Signs, billboards, and other FREE goodies for your use.  We ask only that you help spread the word about The Reading Modeler!

Rolling Stock Reference

Click Here!Downloadable reference documents on the various classes of Reading Company Freight and Passenger rolling stock.

Thanks for Your Support!

If you find the content on The Reading Modeler valuable, won't you please consider supporting our efforts? Your donation will help to offset operating costs and acquire new material to share on the site. Thank you!

Amount: 

Advertisements