FacebookTwitterDiggGoogle BookmarksRedditLinkedinRSS Feed
Welcome, Guest
Username: Password: Remember me
This section of The Interchange provides a space where members of the Reading Modeler community can showcase their Reading modeling efforts. If you've got a project that you'd like to share, start a new topic and "show and tell" the group how you did it!

TOPIC: SW1200m Build

SW1200m Build 10 years 11 months ago #1363

  • rdg5310
  • rdg5310's Avatar
  • OFFLINE
  • Conductor
  • Posts: 265
  • Thank you received: 39
The two SW1200m’s that I’m building are listed below with the detail differences based on Baldwin phases.


2709

Built 9/44 as VO-1000 #59 – 2709 has 3 sets of louvers on the short hood section next to the cab. Straight wall cab and angled side sill at the steps. I will refer this build as #1


Photo credit and permission by Ellis Simons.


2707

Built 1/44 as VO-1000 #78 – 2707 has no louvers on the short hood. It has the curved trim on the cab and side sill. This is #2


Photo credit Kim Piersol.
The administrator has disabled public write access.

SW1200m Build 10 years 11 months ago #1367

  • t1nut
  • t1nut's Avatar
  • OFFLINE
  • Road Foreman of Engines
  • Posts: 323
  • Thank you received: 55
you have to choose from photos when modeling the curved sides. when I did my #2706. I found a photo with the curved sides on the walkway and a later photo of it with them removed.
Butch Curll
The administrator has disabled public write access.

SW1200m Build 10 years 11 months ago #1379

  • sphogger
  • sphogger's Avatar
  • OFFLINE
  • Brakeman
  • Posts: 34
  • Thank you received: 3
Dug out my copy of DIESEL ERA March/April 1996 last night, I am eagerly awaiting to see your postings of this kitbash. In a puny effort to make use of the remains, does anybody have a photograph of a gondola or flatcar with the load being the long hood off a Baldwin switch engine? I understand that more than likely EMD just used a cutting torch to quickly remove what was to be replaced with no salvage of parts concidered save for scrap value alone. Pity, for that would be an interesting load.
Fishnmack
The administrator has disabled public write access.

SW1200m Build 10 years 11 months ago #1402

  • rdg5310
  • rdg5310's Avatar
  • OFFLINE
  • Conductor
  • Posts: 265
  • Thank you received: 39
Frame

I will start the build with the Stewart frame modifications that have to be done in order for the bashed bodies to fit.

The front of the Stewart frame is where the mods take place. The cast block weight has to be cut back a minimum .150 from the front. This will allow the body to sit correctly without any interference from the frame. If you don’t have a mill, you can use a modeler’s hack saw and clean the frame up with a file. I milled #1’s frame and #2 shown below was cut with a hand saw and cleaned up with a Dremel and file.


Not as clean as a mill but was faster to do. I cleaned and washed any metal shavings off the frame. With that mod out of the way, I’m going to start detailing the fuel tank area.
The administrator has disabled public write access.

SW1200m Build 10 years 11 months ago #1407

  • tomjacobs
  • tomjacobs's Avatar
  • OFFLINE
  • Superintendent
  • Posts: 177
  • Thank you received: 37
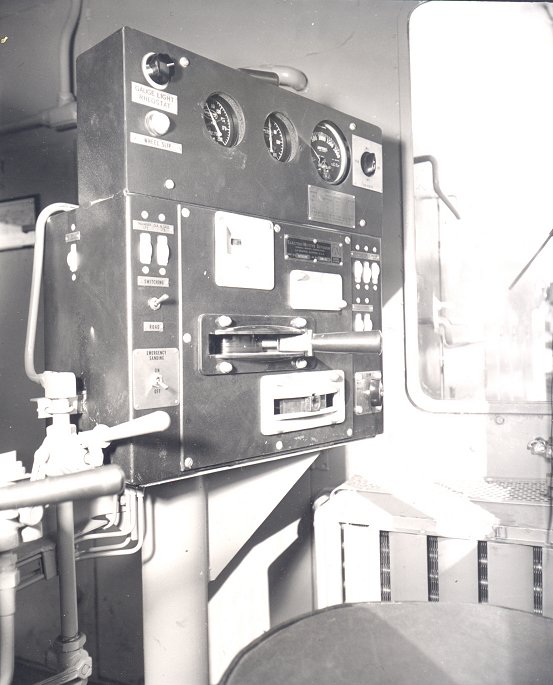
Here is the shot I have of the cab/control stand on the SW1200m - from the back of the photo, this is from #2704.
scan0005.jpg
Tom Jacobs
Webmaster
The Reading Modeler
www.readingmodeler.com
The administrator has disabled public write access.
The following user(s) said Thank You: JoannaBill

SW1200m Build 10 years 11 months ago #1418

  • rdg1187prr
  • rdg1187prr's Avatar
  • OFFLINE
  • Conductor
  • Posts: 197
  • Thank you received: 38
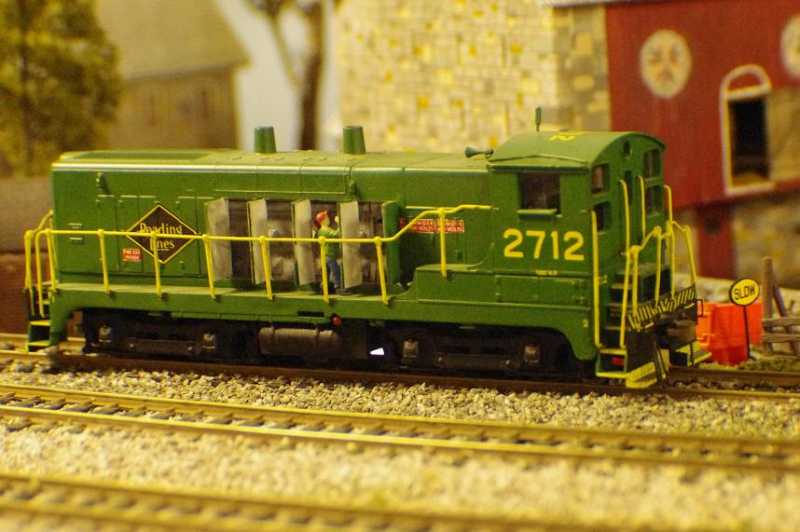
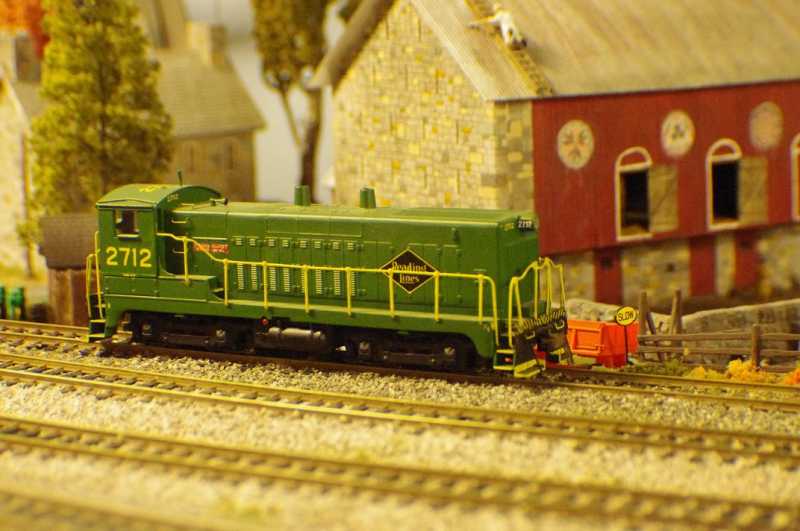
Here is a couple of shots of my SW1200m that I did back in the early 1990's.
It is a kitbash using an Athearn Baldwin and an Athearn SW7. The 2 kits hoods don't match on the top of the hoods. So I had to do a lot of sanding to make them match with each other, I also added a Walthers Prime Mover for that extra detail. Open Hood doors are .010 styrene. Also added were the round corners along the steps by removing them from the SW7. After the glue setup. I rounded the step corners with a file (as the SW7 step corners are angular). Also added the round corners at the walkways next to the cab with some scrap styrene. The firecracker antenna is a piece of 22 gauge "telephone wire" that was stripped 1/2 way for the base and the top part had the insulation left on it to represent the antenna. I used Floquil RDG Green paint and Herald King decals to finish the model.
John Caples
Attachments:
Last Edit: 10 years 11 months ago by rdg1187prr. Reason: addition
The administrator has disabled public write access.
Time to create page: 0.104 seconds

Today's Image

Did You Know?

December 24, 1859
A new terminal opened at Broad and Callowhill Streets in Philadelphia, north of the old facility at Cherry Street.

Downloads

Operations Information

Click Here!A variety of Reading Company operations related documents, etc. that may be of use in your modeling efforts.

Operations Paperwork

Click Here!A variety of Reading Company operations paperwork, such as train orders, clearance forms, etc. that will help you operate your Reading layout in a prototypical manner.

Timetables, Rulebooks, Etc.

Click Here!Public Timetables, Employe Timetables, and Rulebooks that provide much useful operational information.

Modeling Goodies

Click Here!Signs, billboards, and other FREE goodies for your use.  We ask only that you help spread the word about The Reading Modeler!

Rolling Stock Reference

Click Here!Downloadable reference documents on the various classes of Reading Company Freight and Passenger rolling stock.

Thanks for Your Support!

If you find the content on The Reading Modeler valuable, won't you please consider supporting our efforts? Your donation will help to offset operating costs and acquire new material to share on the site. Thank you!

Amount: 

Advertisements