FacebookTwitterDiggGoogle BookmarksRedditLinkedinRSS Feed
Welcome, Guest
Username: Password: Remember me
This section of The Interchange provides a space where members of the Reading Modeler community can showcase their Reading modeling efforts. If you've got a project that you'd like to share, start a new topic and "show and tell" the group how you did it!

TOPIC: RDG SD45

RDG SD45 11 years 1 month ago #1483

  • t1nut
  • t1nut's Avatar
  • OFFLINE
  • Road Foreman of Engines
  • Posts: 323
  • Thank you received: 55
I agree about Herald King decals being better. someone is doing the Herald King line again.
Butch Curll
The administrator has disabled public write access.

RDG SD45 11 years 3 weeks ago #1514

  • rdg5310
  • rdg5310's Avatar
  • OFFLINE
  • Conductor
  • Posts: 265
  • Thank you received: 39
Ok, finally posting my pre-weathering pics and the fix to the rear pilot.


As you can see, I still don’t have the handrails on. Handrails don’t weather like the body does, so they will be added last before final seal coat. With the frame, trucks, body and deck still separated, it allows me to break up the weathering into sections.
The administrator has disabled public write access.

RDG SD45 11 years 2 weeks ago #1515

  • MarkFJ
  • MarkFJ's Avatar
  • OFFLINE
  • Conductor
  • Posts: 227
  • Thank you received: 39
Fantastic!

Are those marker light gaskets painted or a decal?

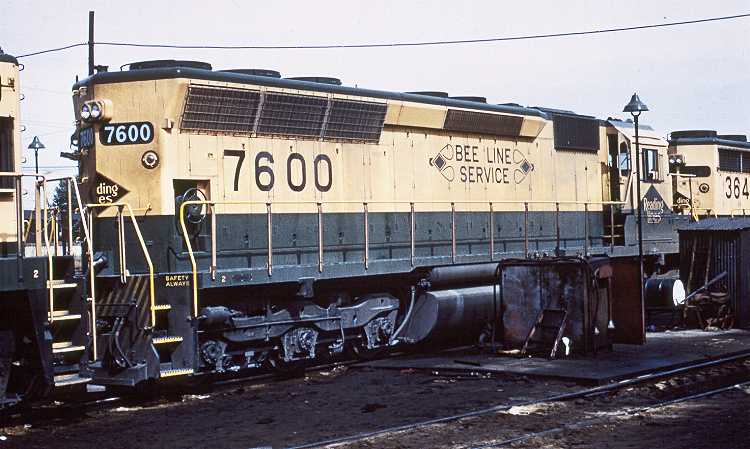
Another photo showing end details and the lack of running boards.

SD-457600.jpg
The administrator has disabled public write access.
The following user(s) said Thank You: rdg5310

RDG SD45 11 years 2 weeks ago #1516

  • rdg5310
  • rdg5310's Avatar
  • OFFLINE
  • Conductor
  • Posts: 265
  • Thank you received: 39
Thanks Mark. The gaskets are from Microscale EMD/GE diesel data.
The administrator has disabled public write access.

RDG SD45 11 years 2 weeks ago #1517

  • rdg5310
  • rdg5310's Avatar
  • OFFLINE
  • Conductor
  • Posts: 265
  • Thank you received: 39
Weathering


There’s nothing uniform when it comes to weathering. The one thing we have to remember is that these locomotives work in all kinds of conditions. General hard work from road grime based on locality’s or muddy track conditions. Maybe a quick run through the wash bay or just heavy down pours add to these variations. So it doesn't matter if one engine has mud splashed up front of the fuel tank or one is loaded down with sand dust in the same consist. These weathered conditions are part of the prototype, so why not create these various conditions on our models?

I've mentioned this before; this SD45 represents a unit in service about 2 years. The yellow has not yet faded heavily, but sand dust and road grime is taking its toll.

But, as we all know, weathering is a personal choice. Some modelers apply a mild weathering with some dust and grime and call it a day. Some modelers put in a little extra time trying to achieve various affects. And then, there are the extreme effects weathering. The extreme weathering does give more realistic results because it’s done in phases, but it takes more time to apply the effects correctly. If you really want to learn about weathering, there are some serious places to go on the net. I learned allot by reading Fine Scale Modeler over the years. I also visit websites like Mig productions forums and AK Interactive forum. Military modelers are the best at what they do. And no, I don’t military model anymore, but you can learn an awful lot from visiting these websites. These are just a few examples of websites that are available to you. There’s also a bunch of military weathering videos on You Tube. Keep in mind though, the military modelers have static displays and our models are being handled. So you need to seal your work when you’re done. For me, I use various weathering techniques for different results, and I’m not afraid to experiment. It’s all about what you’re trying to accomplish.

For weathering the SD45 project, I used the air brush for dusting the frame and fuel tank, enamel washes to add some pop to the details. I weathered the truck frames separately using washes only. I’m not going to get into the complete how to for weathering. The easiest way to learn how to weather either by air brush, washes, pigments and oils is use a junk shell for practice. Do keep in mind; oils take longer to dry than enamels. And there is a method to the madness for sealing oils and enamels with a lacquer overcoat. They are incompatible. Lacquers are a hot solvent and will cause the enamel to bubble up. I’ll touch base on that later and how to avoid that. I will show some pics of the weathering progress with some explanation.

So the weathering process starts from the frame up. I’ve always weathered the trucks differently from the frame. Once you get the frame and trucks weathered, they can be assembled with motors and DCC modules added. When that process is complete it’s time to test run the unit to make sure all is good.


The administrator has disabled public write access.

RDG SD45 11 years 2 weeks ago #1522

  • rdg5310
  • rdg5310's Avatar
  • OFFLINE
  • Conductor
  • Posts: 265
  • Thank you received: 39
Looking at the photos of the truck frames, you can see the variation in color. Each color represents some form of weathering or road conditions. The truck frames go through hell and back with extreme heat from braking, brake dust, excessive sanding and just a lack of cleaning that takes a toll on the black paint until they are shopped. All coloring came from enamel washes. I use enamel washes sold by AK international and I make my own enamel washes using Model Master flat black. The AK washes used were rust streaks, dust effects, engine grime, streaking grime. All blended using AK’s white spirits. The Model Master flat black wash was used to level out color and add depth to some details. I made the wash using mineral spirits.

Now this isn't done all in one shot, the truck frames took a couple of days. Drying time is very important to get the results you’re looking for. If you mess it up and can’t fix it, a thinned thin coat of original paint will take care of the problem.

If you’re wondering, I didn't paint the bearings yellow because the Reading didn't paint the bearings until the wheel sets where shopped. So my SD reflects that.

When the frame had completely dried, I started the weathering with a thin light over spray of dusty grey over the tank and under frame followed by light streaks of brown dust. I highlighted all cables with a Floquil black wash to add depth and streaked old fuel oil spills on the tank. I let the frame dry for a day and began using the AK washes to enhance the details I added. I also used the washes heavily on the front and rear of the fuel tank. I used what AK calls engine grime wash. I also used AK’s engine oil to create the fresh fuel oil overflows.
The administrator has disabled public write access.
Time to create page: 0.169 seconds

Today's Image

Did You Know?

April, 1957
The famous green "READING LINES" bridge over Shepps Dam on the Reading Belt Line (near Carpenter Steel) enters service.

Downloads

Operations Information

Click Here!A variety of Reading Company operations related documents, etc. that may be of use in your modeling efforts.

Operations Paperwork

Click Here!A variety of Reading Company operations paperwork, such as train orders, clearance forms, etc. that will help you operate your Reading layout in a prototypical manner.

Timetables, Rulebooks, Etc.

Click Here!Public Timetables, Employe Timetables, and Rulebooks that provide much useful operational information.

Modeling Goodies

Click Here!Signs, billboards, and other FREE goodies for your use.  We ask only that you help spread the word about The Reading Modeler!

Rolling Stock Reference

Click Here!Downloadable reference documents on the various classes of Reading Company Freight and Passenger rolling stock.

Thanks for Your Support!

If you find the content on The Reading Modeler valuable, won't you please consider supporting our efforts? Your donation will help to offset operating costs and acquire new material to share on the site. Thank you!

Amount: 

Advertisements